How to setup load balanced SSRS Servers for CRM 2016
While not very common, there are times when a customer or client requests two servers for the CRM SRS data connector/SSRS to be installed and have load balancing configured for the servers. The idea here is failover; when one server hosting SSRS crashes, all incoming requests are routed to the secondary server. There are a couple of ways to do this, but the following method is the most straightforward and simplistic way.
1. Create a Virtual IP(VIP) to route to each SSRS server.
In order for this method to work, a virtual IP will need to be created. The virtual IP will accept incoming data packets, then route the requests to each of the IP addresses of the physical servers that will have SSRS installed.
2. Install and configure SSRS on each server.
Install and configure SSRS on each server as you typically would by pointing to the SQL server and/or instance where you would like the report server databases to be located.
3. Install the CRM SRS data connector on each server.
Grab the installation files for your respective version of CRM and install the data connector on both servers. Install the data connector as you would for a typical CRM deployment.
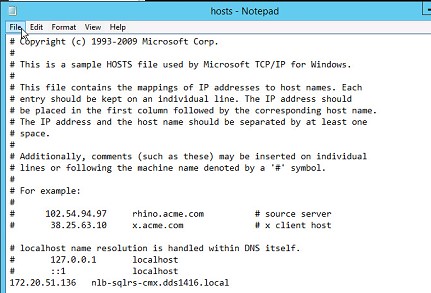
4. Configure the host file on each SSRS server.
On both SSRS servers, open the host file: C:\Windows\System32\Drivers\etc\hosts. Edit the host file by adding the IP and DNS name of the virtual IP created in step 1:
5. Add the BackConnectionHostNames registry key with the server name and FQDN.
Open Registry Editor on one of the SSRS servers, and locate the following registry key: HKEY_LOCAL_MACHINE\SYSTEM\CurrentControlSet\Control\Lsa\MSV1_0.
Right click MSV1_0, point to New and then click Multi-String Value. Type BackConnectionHostNames, then press ENTER.
Right click BackConnectionHostNames, then click Modify.
In the Value data box, type the host name of the VIP and FQDN of the VIP, and click OK.

Repeat these steps for the other SSRS server.
6. Add hostname and URL root values.
On one of the SSRS servers, make a backup of the reportserver.config file located here: C:\Program Files\Microsoft SQL Server\MSRS11.MSSQLSERVER\Reporting Services\ReportServer.
Right click the original reportserver.config file and choose edit.
Modify the hostname and URL root tags of the .xml file located under the service tag by adding the FQDN of the VIP as shown below:

Save the file after making the changes.
Repeat these steps for the other SSRS server.
7. Restart both SSRS servers.
8. During the import or new creation of an organization in CRM, specify the name of the VIP.
Use the VIP created in step 1 when prompted for the reporting services URL during a new org creation or an org import: